
Complete Guide: Capturing High-Quality Sound with Windows 11

Complete Guide: Capturing High-Quality Sound with Windows 11
Quick Links
Key Takeaways
- For simple audio recording, open the Start Menu, search for Sound Recorder, launch the app, click the Record button, and start speaking into the mic.
- For advanced audio recording, download and install Audacity, launch the app, select the Record button, and start speaking into the mic.
Whether you want to record a small voice note or an entire song, it’s possible to do it using built-in or third-party apps on Windows 11. We’ll show you how to do that.
Using the Built-In Sound Recorder App
If you aren’t looking for features like multi-track recording and editing options, Windows 11’s Sound Recorder app is the best way to record the audio on your PC. The app supports multiple audio formats and quality options.
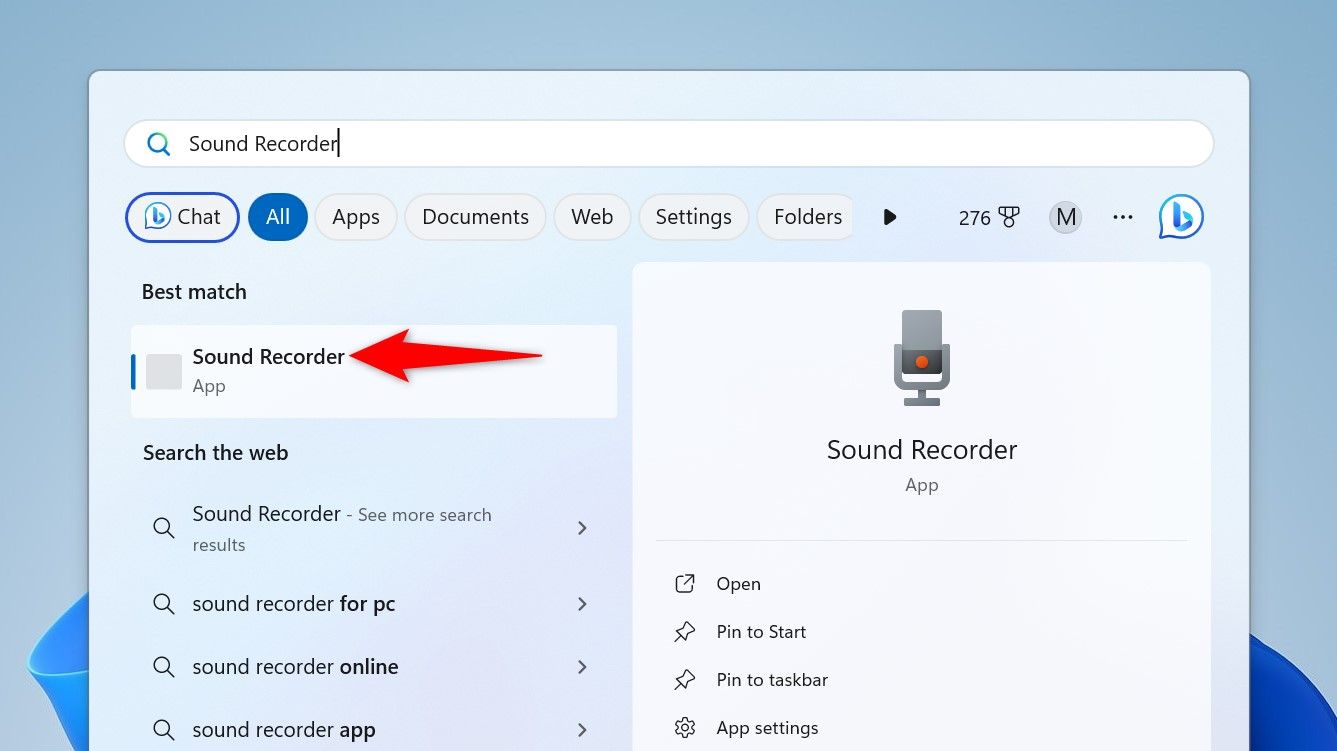
To use it, open the Start Menu, search for Sound Recorder, and select the app.
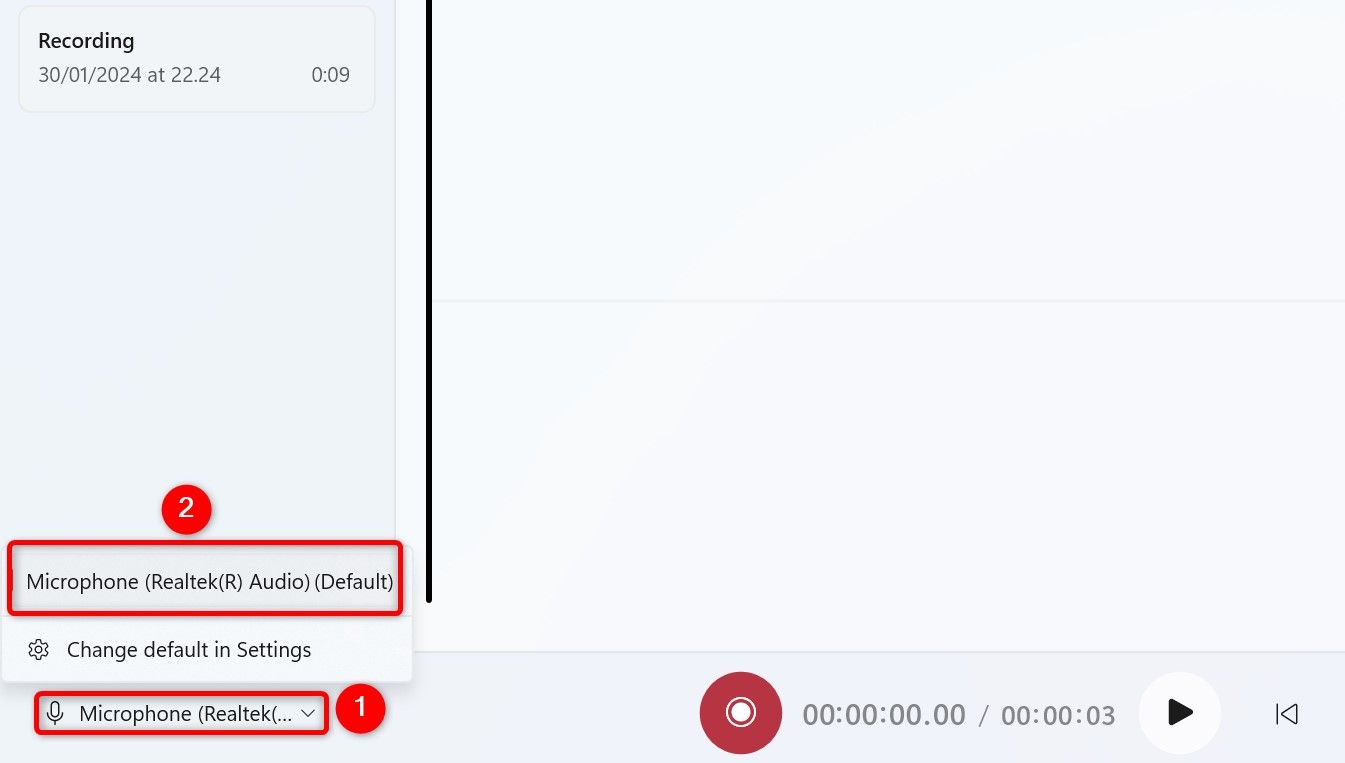
If you have multiple microphones attached to your PC, you must first choose the mic you want to use for the recording. Do that by clicking the microphone icon in the bottom-left corner and selecting the mic you want.
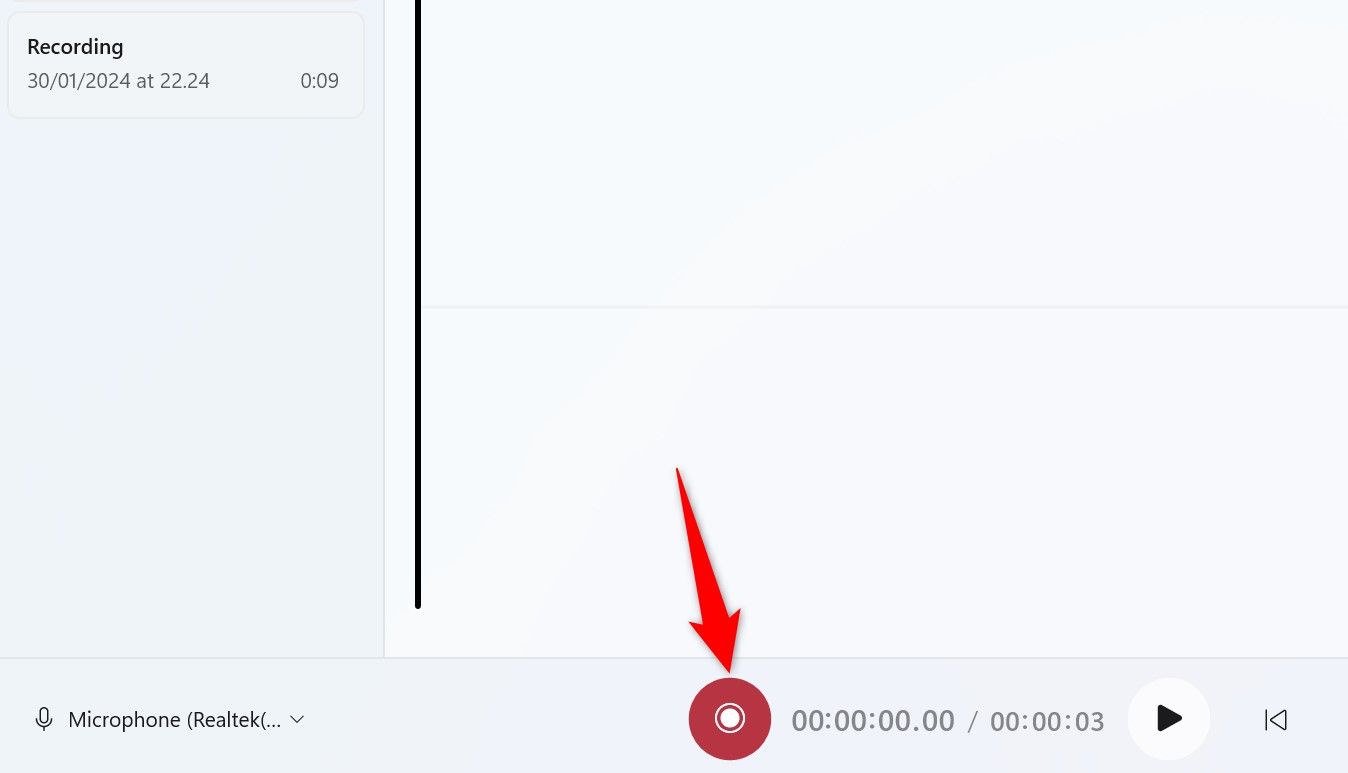
You’re now ready to begin recording your audio. To do that, either select the Start Recording button (the large circle-shaped button) or press Ctrl+R.
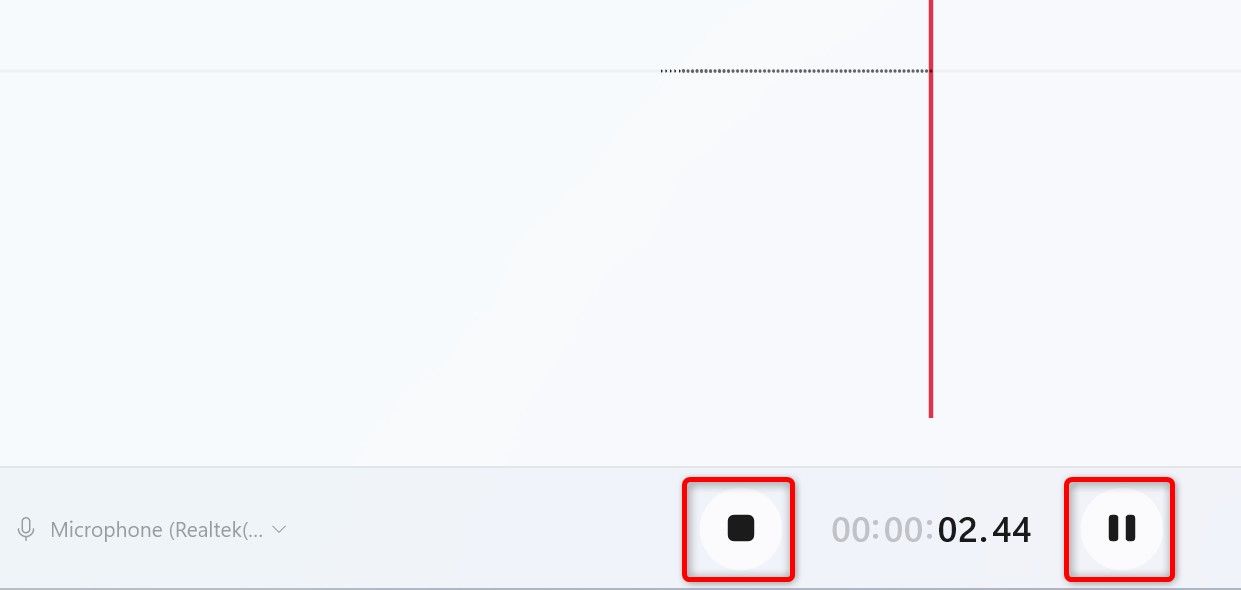
Start speaking into the mic, and the app will record your voice.
If you wish to pause the recording, click the Pause button. To stop the recording, click the Stop Recording button or press the Escape key.
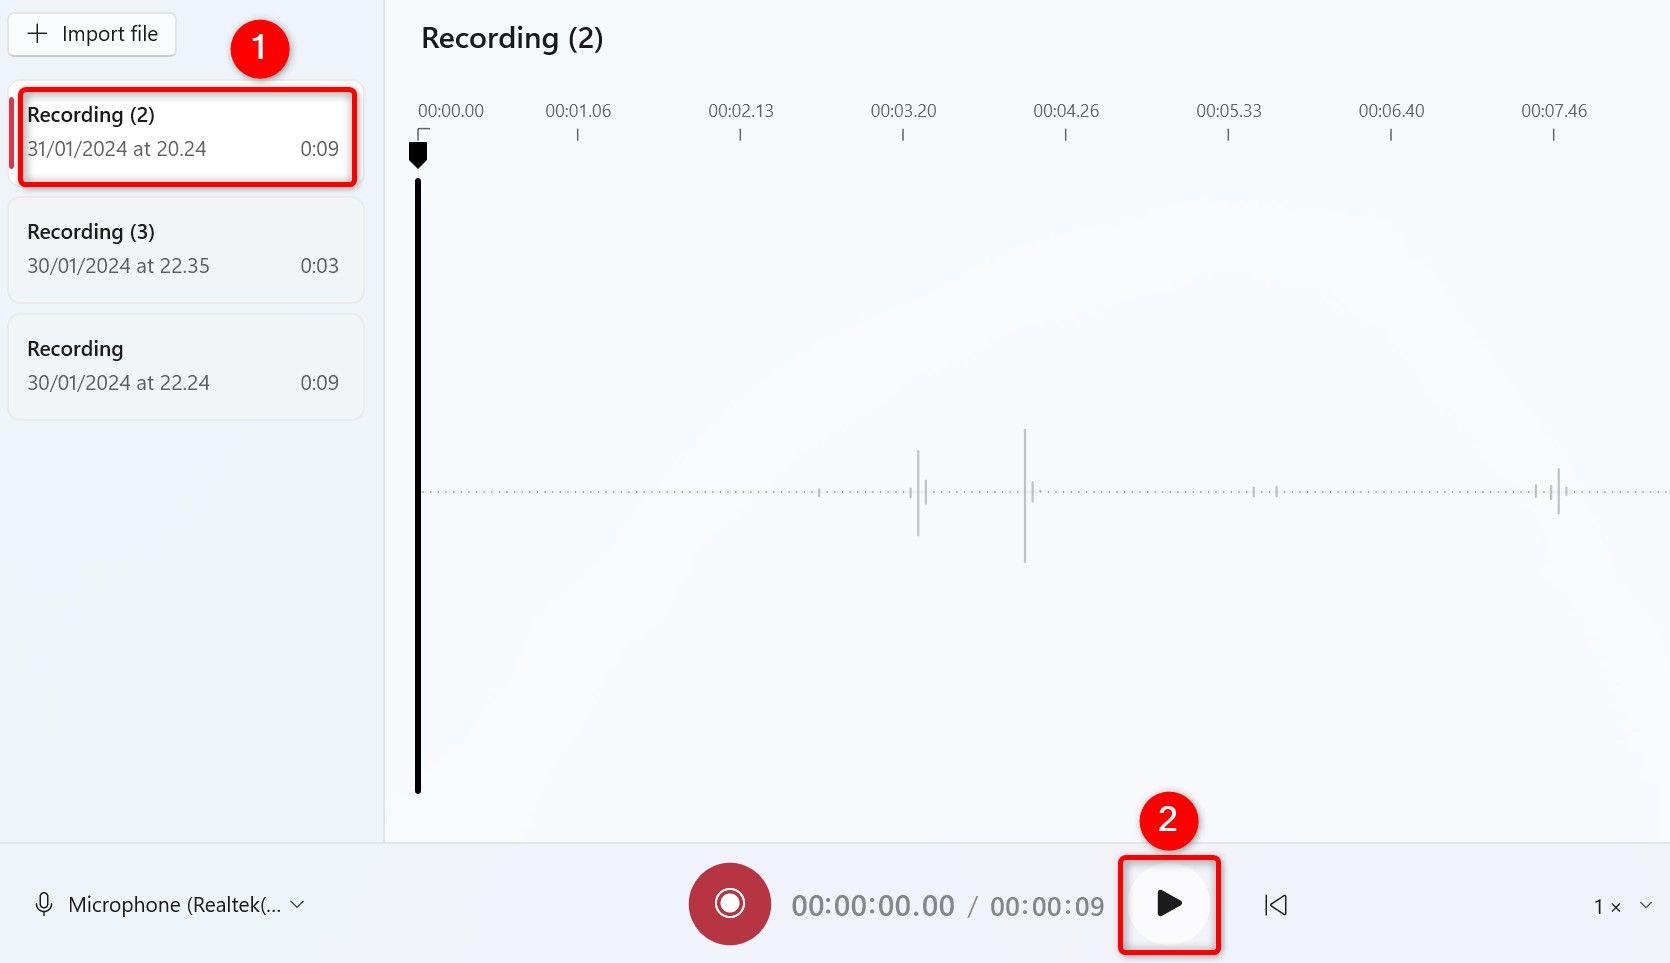
Sound Recorder will save the recording and display it in the left sidebar. To play the recording, select it in the left sidebar and click the Play button or press Spacebar.
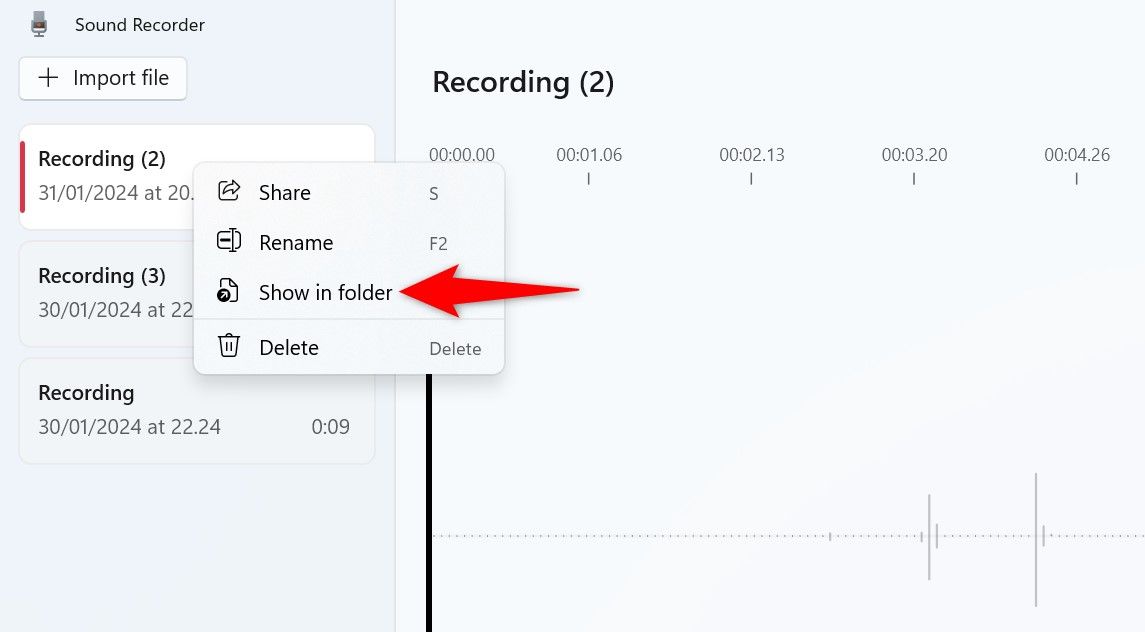
If you’d like to access the audio file of your recording, right-click the recording and choose “Show in Folder.”
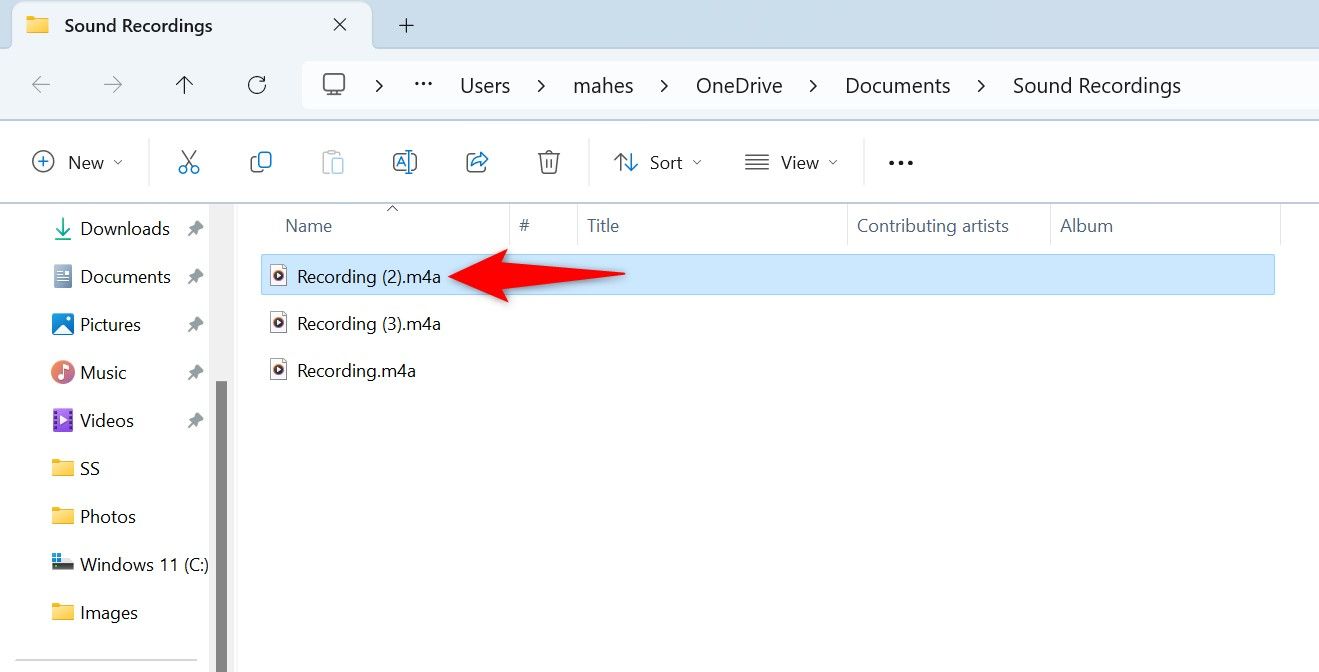
A File Explorer window will launch, highlighting the selected recording file. You can copy this file to any folder you want or upload it online to cloud storage, like Google Drive .
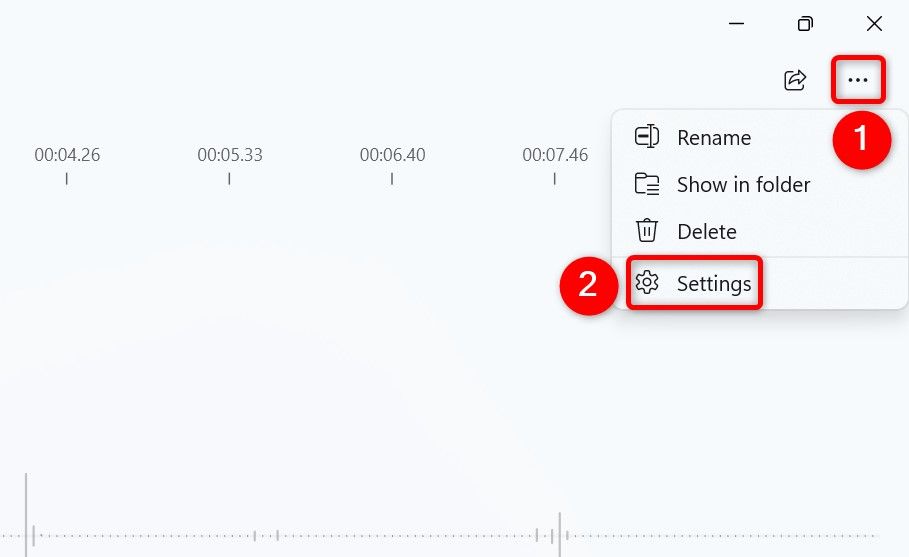
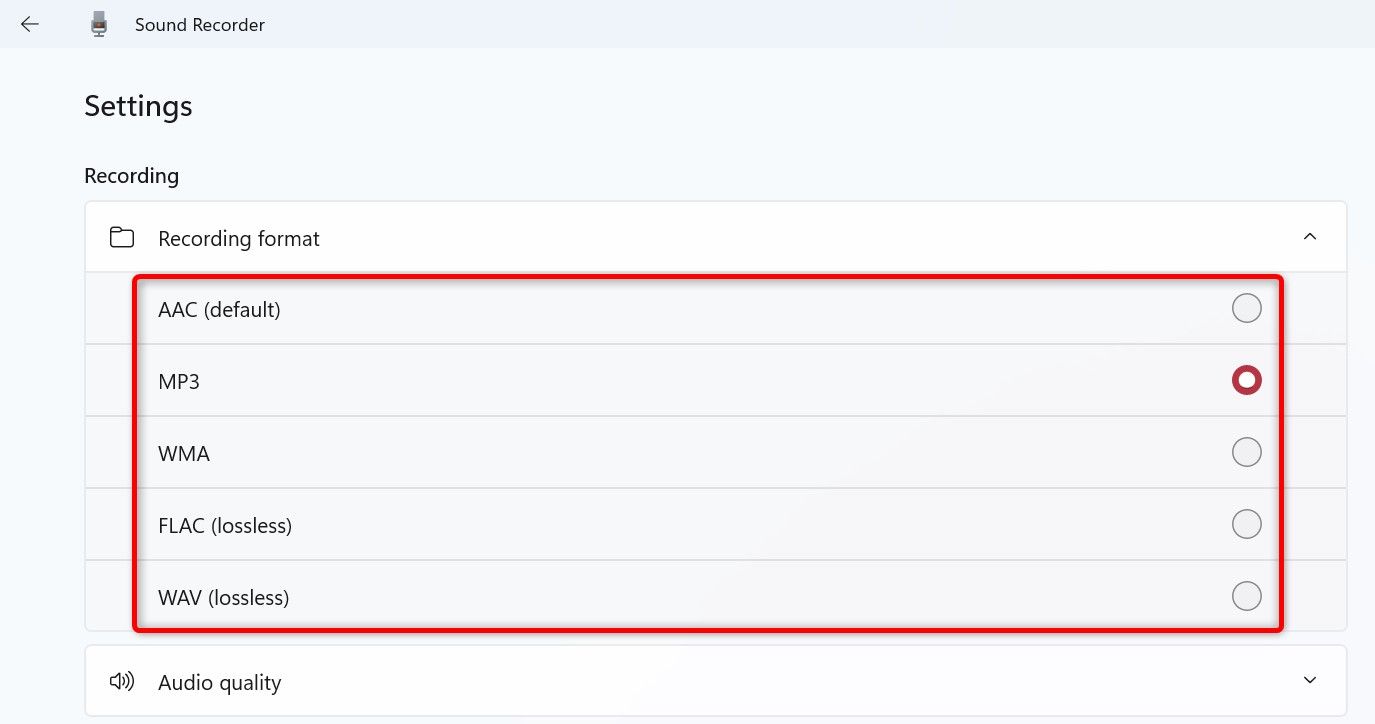
By default, Sound Recorder saves recordings in the M4A format. If you want to change this to a more popular format like MP3 , in the app’s top-right corner, click the three dots and choose “Settings.”
In the Recording section, click “Recording Format.” Select the format you’d like to use.
If you want to change the recording quality, select the “Audio Quality” section. Choose the quality you’d like the app to use for the recordings.
The higher the audio quality, the larger the audio file size.
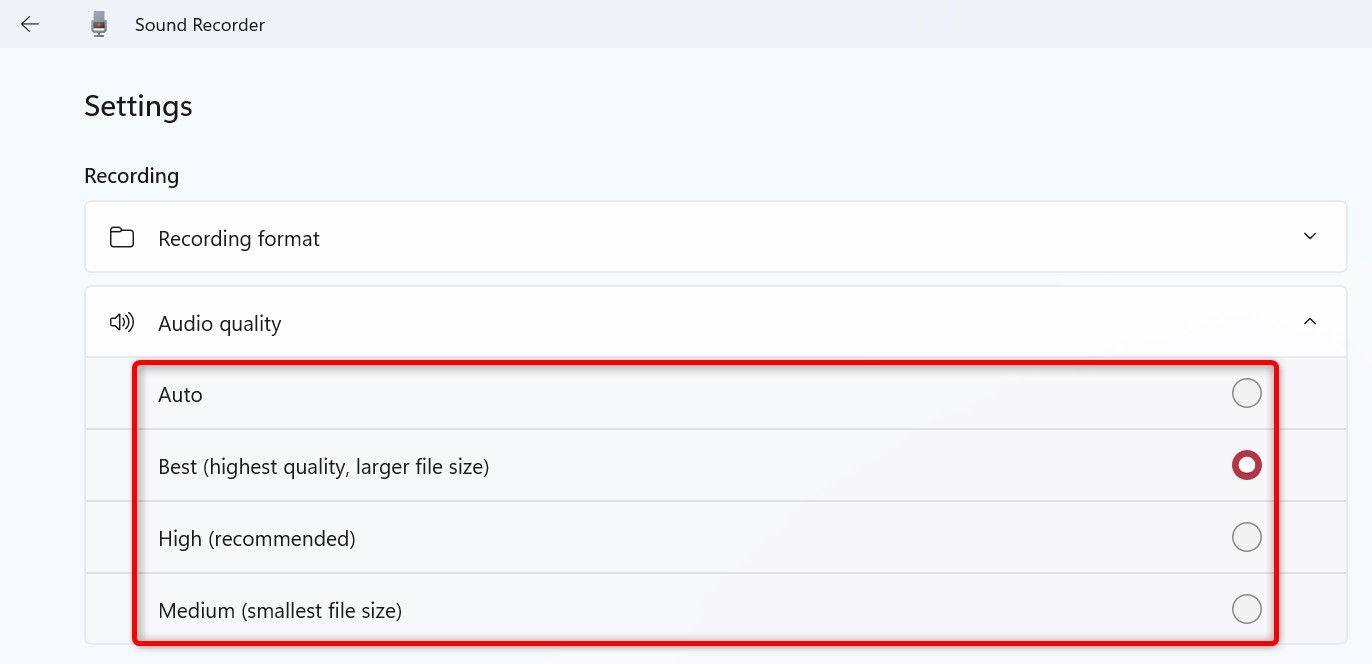
Sound Recorder automatically saves your changes, so you don’t have to click any buttons.
With Audacity - A Free and Open-Source App
If you want more powerful audio editing features and multi-track recording, Audacity is the answer. It’s a free and open-source audio recording app that’s been around for a long time.
To use Audacity, launch a web browser on your PC and head to the official Audacity website . Download and install the app on your computer, then launch it.
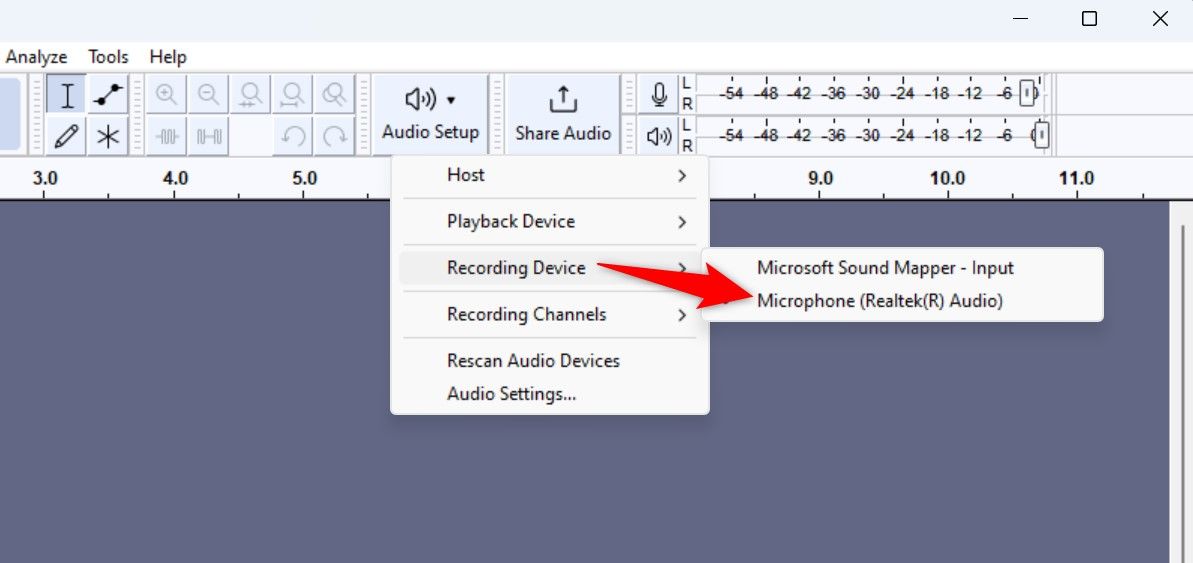
Once you open Audacity, first, choose the mic that you want to use. Pick your mic by navigating to Audio Setup > Recording Device in the top toolbar and selecting your preferred mic.
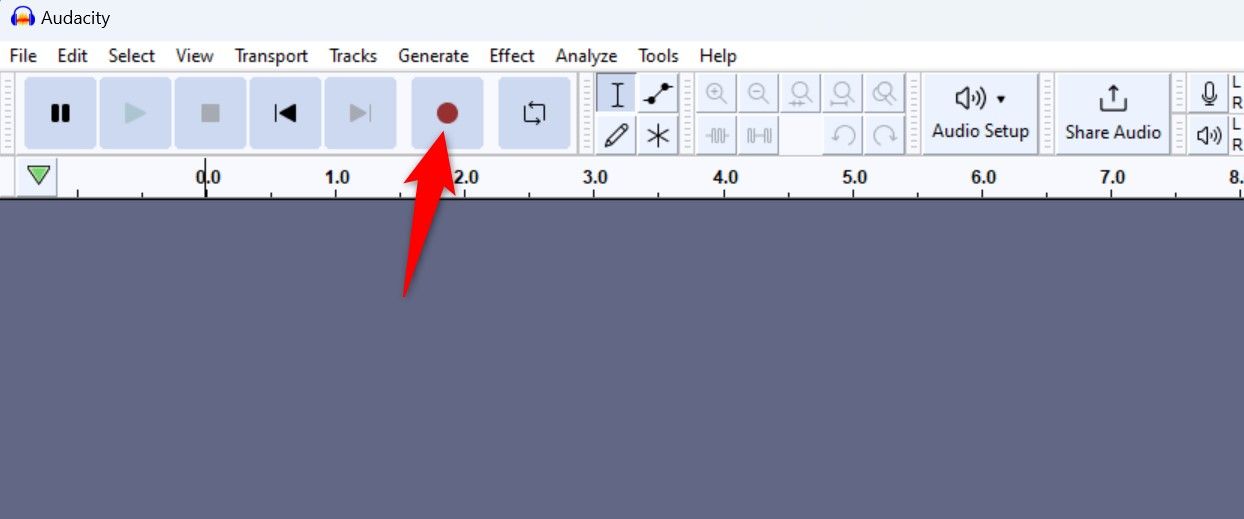
To start recording, click Record (a red button) on the top toolbar, or press the R key.
Audacity is now listening, so speak into your mic. If you wish to pause the recording, click the Pause button or press P. To stop the recording, click the Stop button.
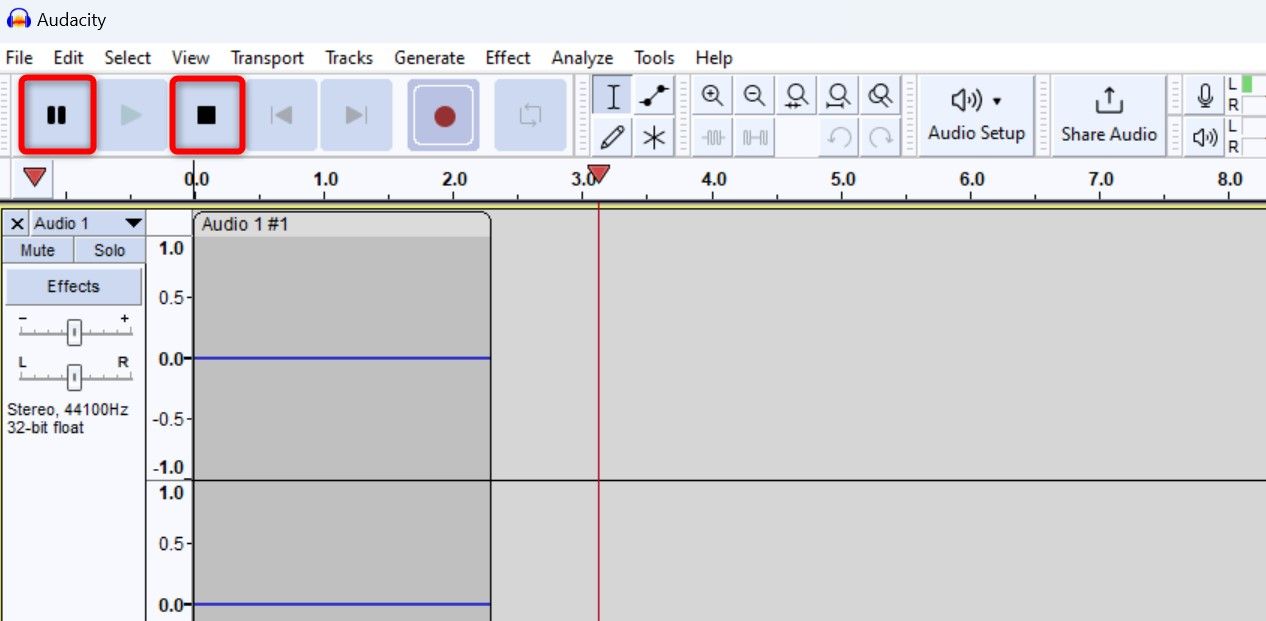
Unlike Sound Recorder, Audacity doesn’t save recordings automatically. You have two ways to save your recorded audio in the app.
The first way is to save your entire Audacity audio project. This retains any edits you’ve made to your recorded audio. To do this, from the app’s menu bar, select File > Save Project > Save Project. Later, you can open this project and resume your editing.
If you only wish to save your recording, from the menu bar, select File > Export Audio.
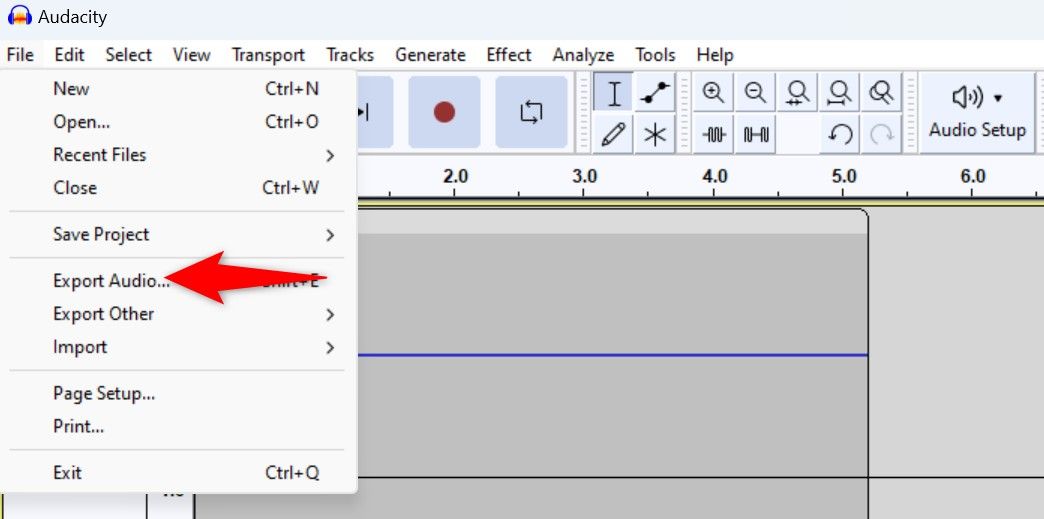
In the Export Audio window, click “Browse” and choose the location and the file name for the audio file. Click the “Format” drop-down menu and choose your preferred audio format for the file. You should choose MP3 if you’re unsure what to select, as this format plays on nearly all devices.
If you’d like, configure the other options, then click “Export” at the bottom.
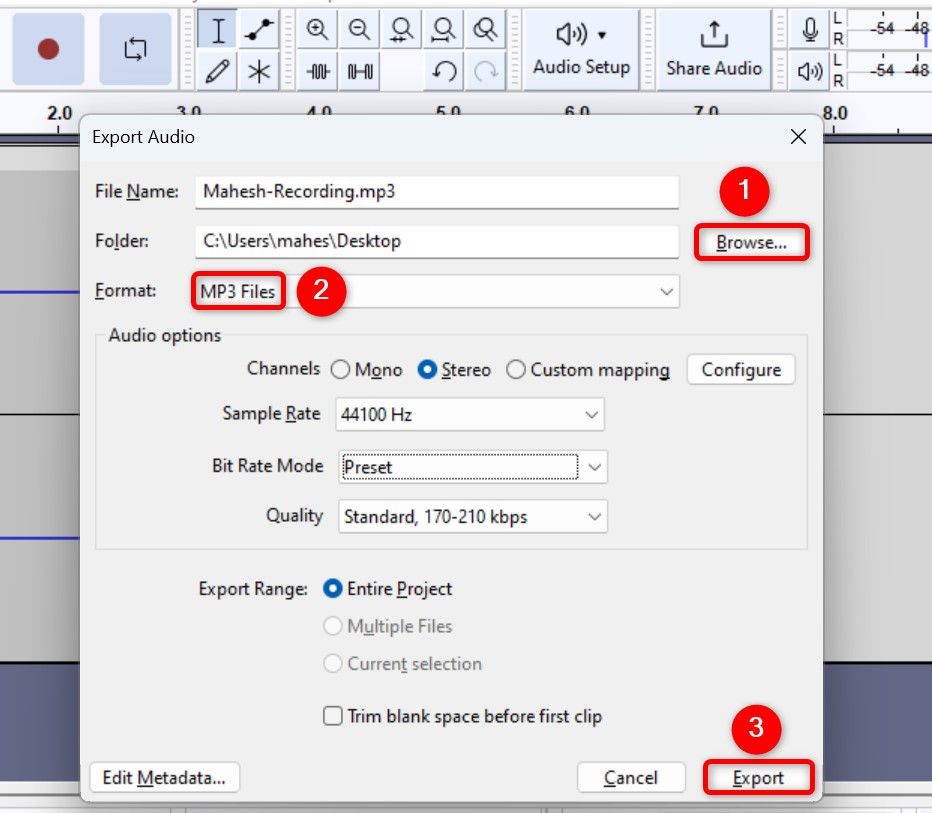
Audacity has saved the recording file in the chosen folder. You’re all set.
If you want to record your PC’s system sound , like the sound of error messages, games, and apps, rather than your microphone, there are a few ways to do it. Happy recording!
Also read:
- [New] 2024 Approved Android Freedom The Most Popular Top 10 FB Video Extraction Tools
- [New] SRT Decoded Core Concepts Simplified and Explained
- [Updated] 2024 Approved Best Cloud Storage Deals – Prices to Watch
- Easy Peasy Free SMS Apps for iPhone & iPod Users: Discover Them Now
- From Frozen to Functional: The Ultimate Guide to Resetting Your MacBook Pro
- How Do You Get Sun Stone Evolutions in Pokémon For Motorola Moto G14? | Dr.fone
- In 2024, The Best Android SIM Unlock Code Generators Unlock Your Xiaomi 14 Pro Phone Hassle-Free
- Maximizing Your Laptop's Efficiency with Windows 10 Battery Management Features
- Navigating the World of Smart Televisions: A Guide to Making an Informed Decision with These 7 Tips
- Quick & Free Driver Installs: Asus USB-BT400
- Simple Steps: Transforming Your TREC Files Into AVI Format - The Most Straightforward Way
- Streamline Software Maintenance: A Selection of Top 11 Gratis Program Update Tools
- The Art of Assembly Crafting Your Personalized 4K Video Editor PC for 2024
- Unleashing Potential for Progress at Relemar via ABBYY FlexiCapture Integration
- Title: Complete Guide: Capturing High-Quality Sound with Windows 11
- Author: Stephen
- Created at : 2024-12-09 03:41:27
- Updated at : 2024-12-11 00:39:21
- Link: https://tech-recovery.techidaily.com/complete-guide-capturing-high-quality-sound-with-windows-11/
- License: This work is licensed under CC BY-NC-SA 4.0.