
Solving 'No Internet Access' Issue: Top 10 Windows 11 Troubleshooting Steps for Wi-Fi Connectivity

Solving ‘No Internet Access’ Issue: Top 10 Windows 11 Troubleshooting Steps for Wi-Fi Connectivity
Quick Links
- Ensure the Problem Isn’t With Your ISP
- Check How Widespread the Issue Is
- Turn Off the VPN and Proxy Server
- Disconnect Other Wi-Fi Networks
- Remove the Data Limit
- Run the Network and Internet Troubleshooter
- Ensure the IP Address Isn’t Invalid
- Update the Network Adapter Driver
- Perform a Network Reset
- Run a Few Commands in the Command Prompt
Key Takeaways
- Check if your ISP is experiencing any outages, connect other devices to your Wi-Fi network to determine if the issue lies with your router or modem, and disable any VPN or proxy server.
- Forget other Wi-Fi networks. Open the Settings app, go to Network and Internet > Wi-Fi, and click “Manage Known Networks.” Then, click the “Forget” button.
- Run the Network and Internet troubleshooter. Go to Settings > System > Troubleshoot > Other Troubleshooters. Then, click the “Run” button next to Network and Internet.
Does your device appear connected to Wi-Fi, but you cannot access the internet? Have you encountered a message like “No Internet Access” This indicates a problem with your router, device settings, or a potential technical issue with your ISP. Take these steps to resolve the issue.
Ensure the Problem Isn’t With Your ISP
Before you begin troubleshooting, you must check for any network outages from your internet service provider. Such occurrences are rare, and your provider should have notified you if there was an outage. However, it’s still a good idea to double-check.
Head to the Downdetector website and search for your ISP’s name to see if other users who use the same ISP have reported any issues. Also, check your ISP’s Twitter account to confirm.
Check How Widespread the Issue Is
If there are no reported issues with your ISP, check whether the problem is isolated to a single device or affects multiple devices. Connect your other devices to the same Wi-Fi network and check if they successfully connect to Wi-Fi, enabling you to use the internet as usual.
If the problem persists across multiple devices, reboot your modem and router . You can also perform a hard reset on your router , which erases all router data and restores it to its default settings. This often resolves many issues.
To hard reset your router, locate the reset button and hold it for 10 seconds. If that doesn’t work, try holding the button for 30 seconds, then unplug the router for 30 seconds before plugging it back in. Finally, hold the reset button again for another 30 seconds.
You can also connect directly to the network using an Ethernet cable to check for router issues. If the problem persists with the Ethernet connection, it could indicate a configuration issue with your ISP or a major hardware fault with your modem and router. In this case, contact your ISP for further assistance.
If the internet works properly on other devices connected to the same Wi-Fi network but not your device alone, the issue may be specific to your device. In that situation, you should try the following fixes.
Turn Off the VPN and Proxy Server
If your VPN connection times out or the server you’re trying to connect to gets overloaded, it can cause internet access issues. To check if this is the case, try toggling the VPN connection off and on again. Also, switch to a different server to see if server overload is the problem. You can also temporarily disable the VPN to determine if it’s causing the connection problem.
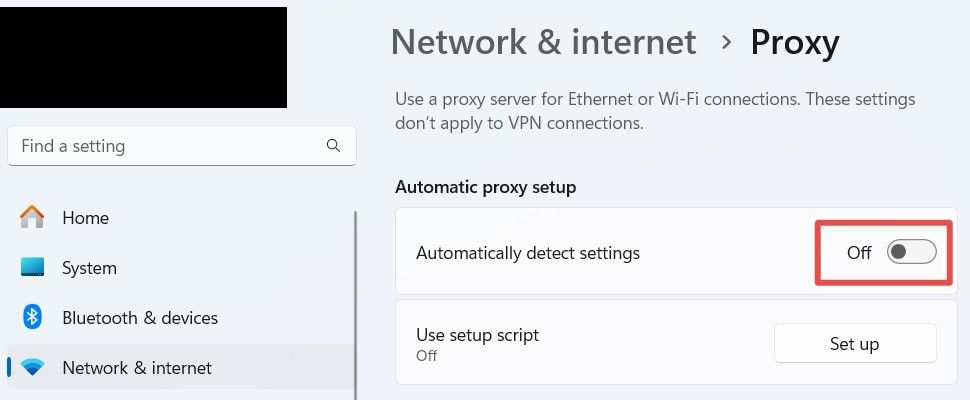
Likewise, while using a proxy server can enhance the privacy of your internet activity, it can also cause connectivity issues. So, turn off the proxy server as well. Press Win+i to open Settings, and head to Network & Internet > Proxy. In the Automatic Proxy Setup section, turn off the toggle next to Automatically Detect Settings.
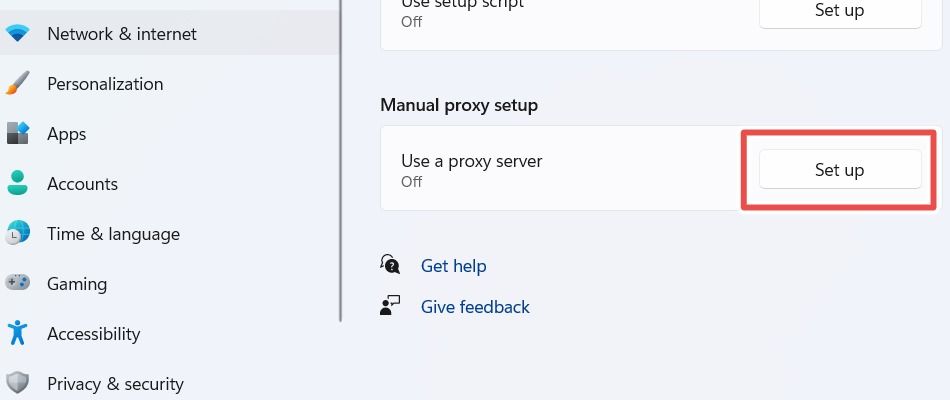
In the Manual Proxy Setup section, click “Set Up” next to Use a Proxy Server, turn off the “Use a Proxy Server” toggle and click “Save.”
Disconnect Other Wi-Fi Networks
Your laptop might be connected to a Wi-Fi network that’s disconnected from the internet, which could be why you don’t have internet access. Windows laptops automatically switch to the fastest available network, and your device may have automatically switched to a different Wi-Fi network.
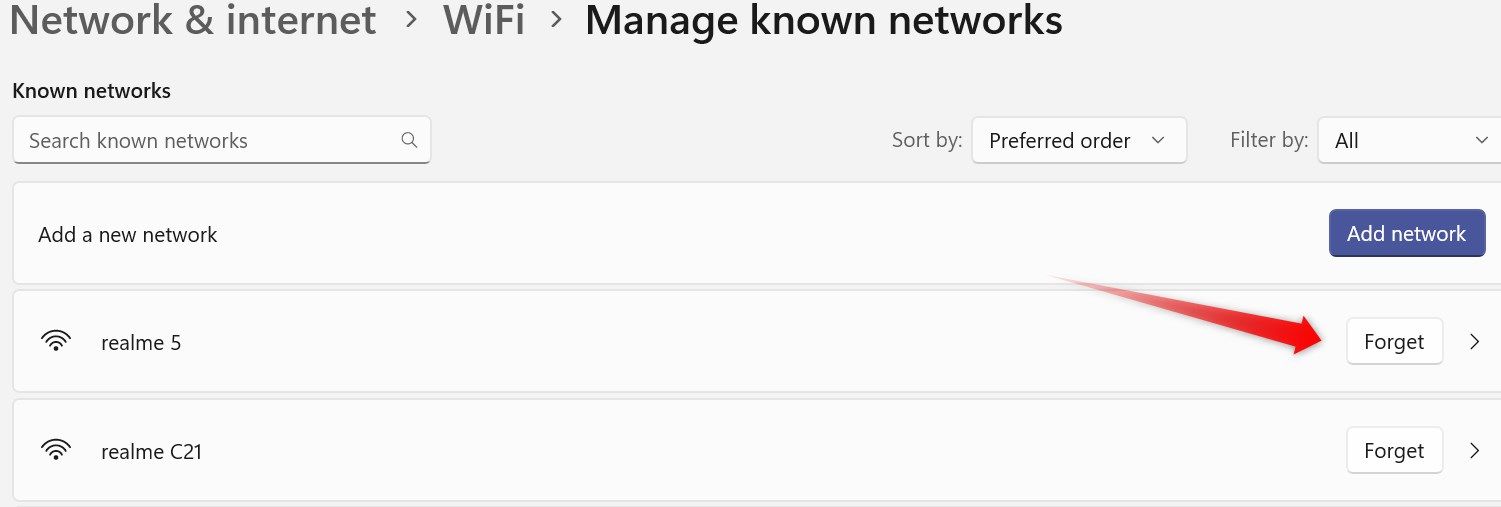
To confirm that you’re connected to the right Wi-Fi network, open the Action Center and check which Wi-Fi network your laptop is connected to. If it’s not the one you expected, forget other Wi-Fi networks to prevent automatic switching. To forget a network, open the Settings app and go to Network and Internet > Wi-Fi. Then, click on “Manage Known Networks.”

From there, click the “Forget” button next to each Wi-Fi network to remove it entirely from your laptop.
Remove the Data Limit
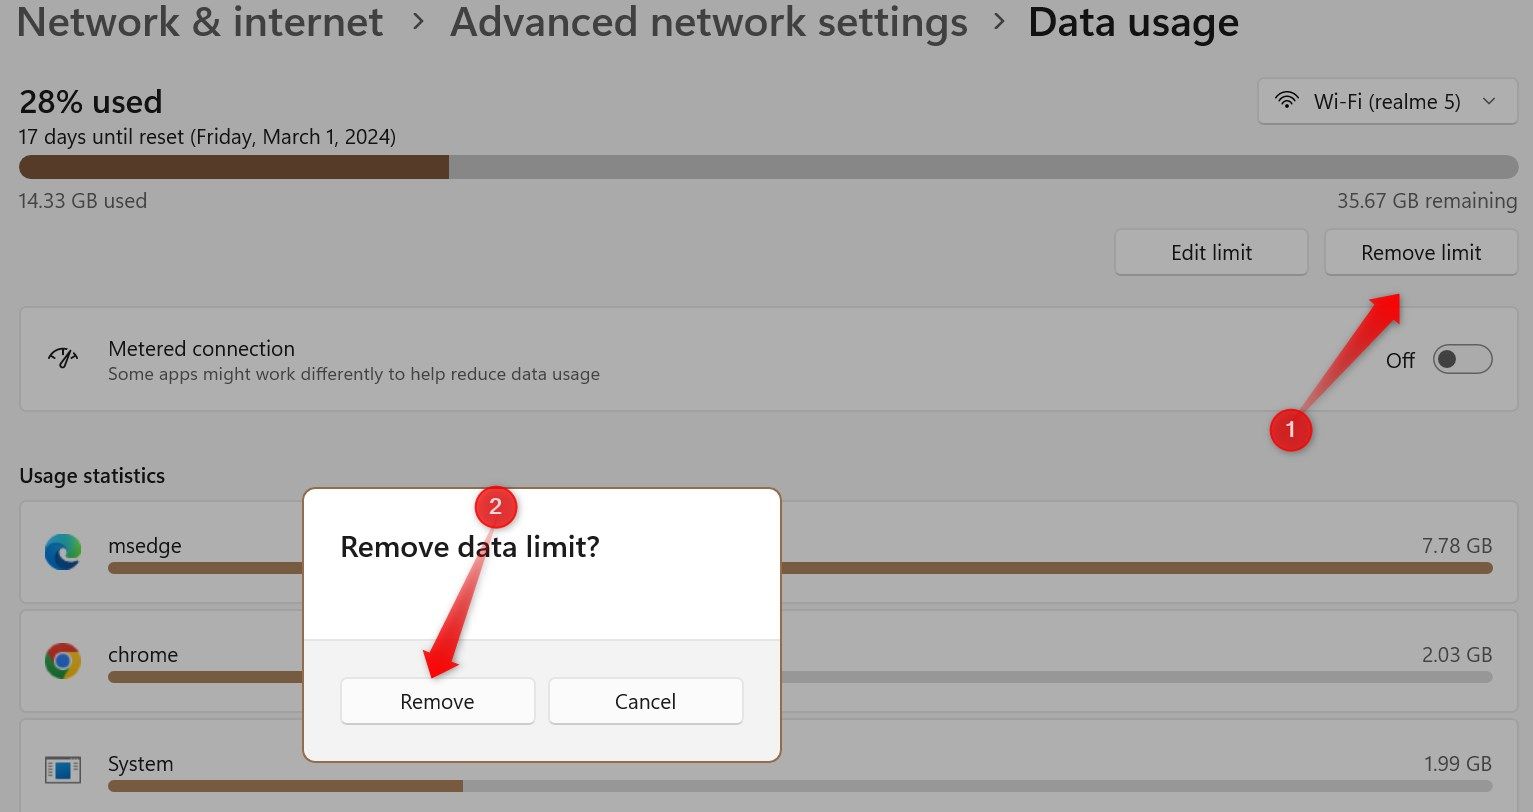
Windows allows users to restrict their data usage , which is especially useful if they have a limited data plan or their ISP charges them based on data usage. When this limit is reached, internet access is disabled even though the device appears to be connected to Wi-Fi. To check this, navigate to Network and Internet > Advanced Network Settings > Data Usage.

To remove the set data limit, click the “Remove Limit” button and click “Remove” in the pop-up.
Users can also set data limits on their phones (for hotspot connections) or within their router settings. Ensure that data usage is not limited there either.
Run the Network and Internet Troubleshooter
Windows includes a built-in network troubleshooter that automatically detects and resolves network problems. This tool might help you fix the issue you’re experiencing. To run it, right-click the Start button and open “Settings.” Then, click the “System” tab and open “Troubleshoot.” From there, navigate to “Other Troubleshooters.”
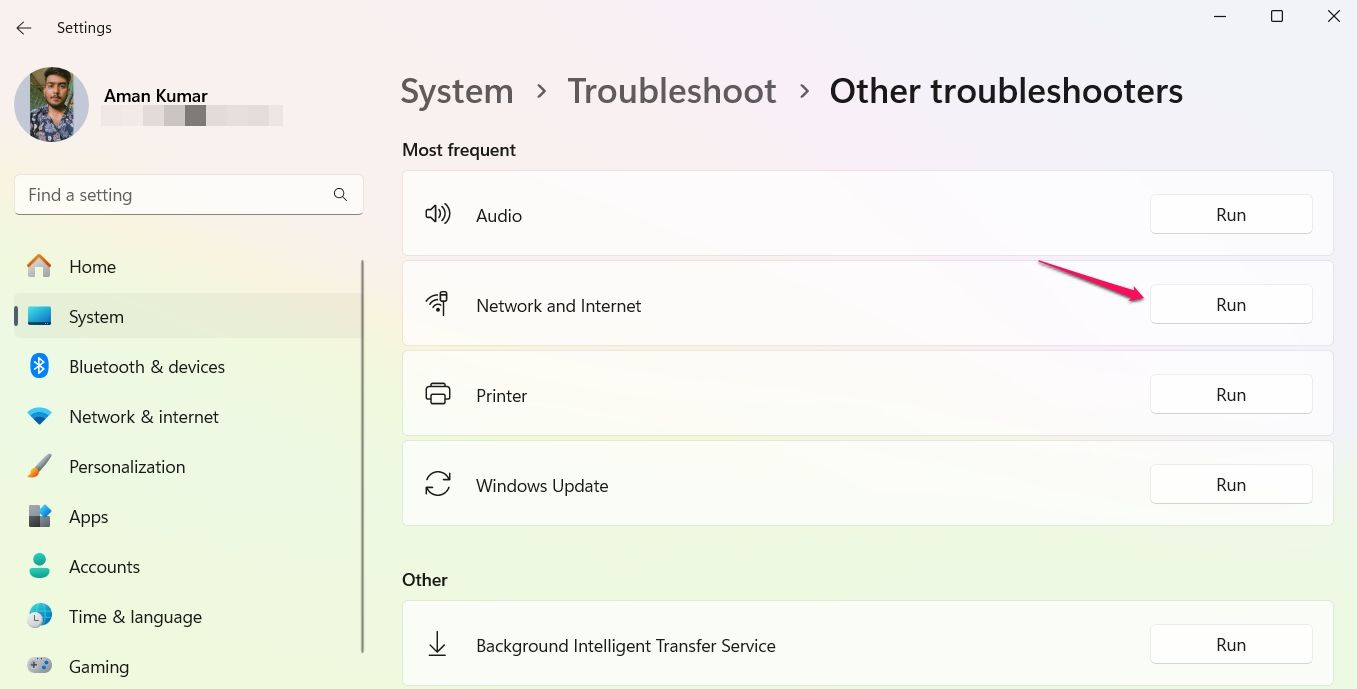
Next, click the “Run” button next to Network and Internet. Windows will open the Get Help app, which will guide you through instructions to identify and fix the problem.
Ensure the IP Address Isn’t Invalid
If you’ve manually added an IP address and started experiencing issues afterward, the address might be invalid. Configure your device to automatically obtain the IP address to prevent this possibility. Open the Settings app and go to Network and Internet > Advanced Network Settings. Expand your Wi-Fi network and open “View Additional Properties.”
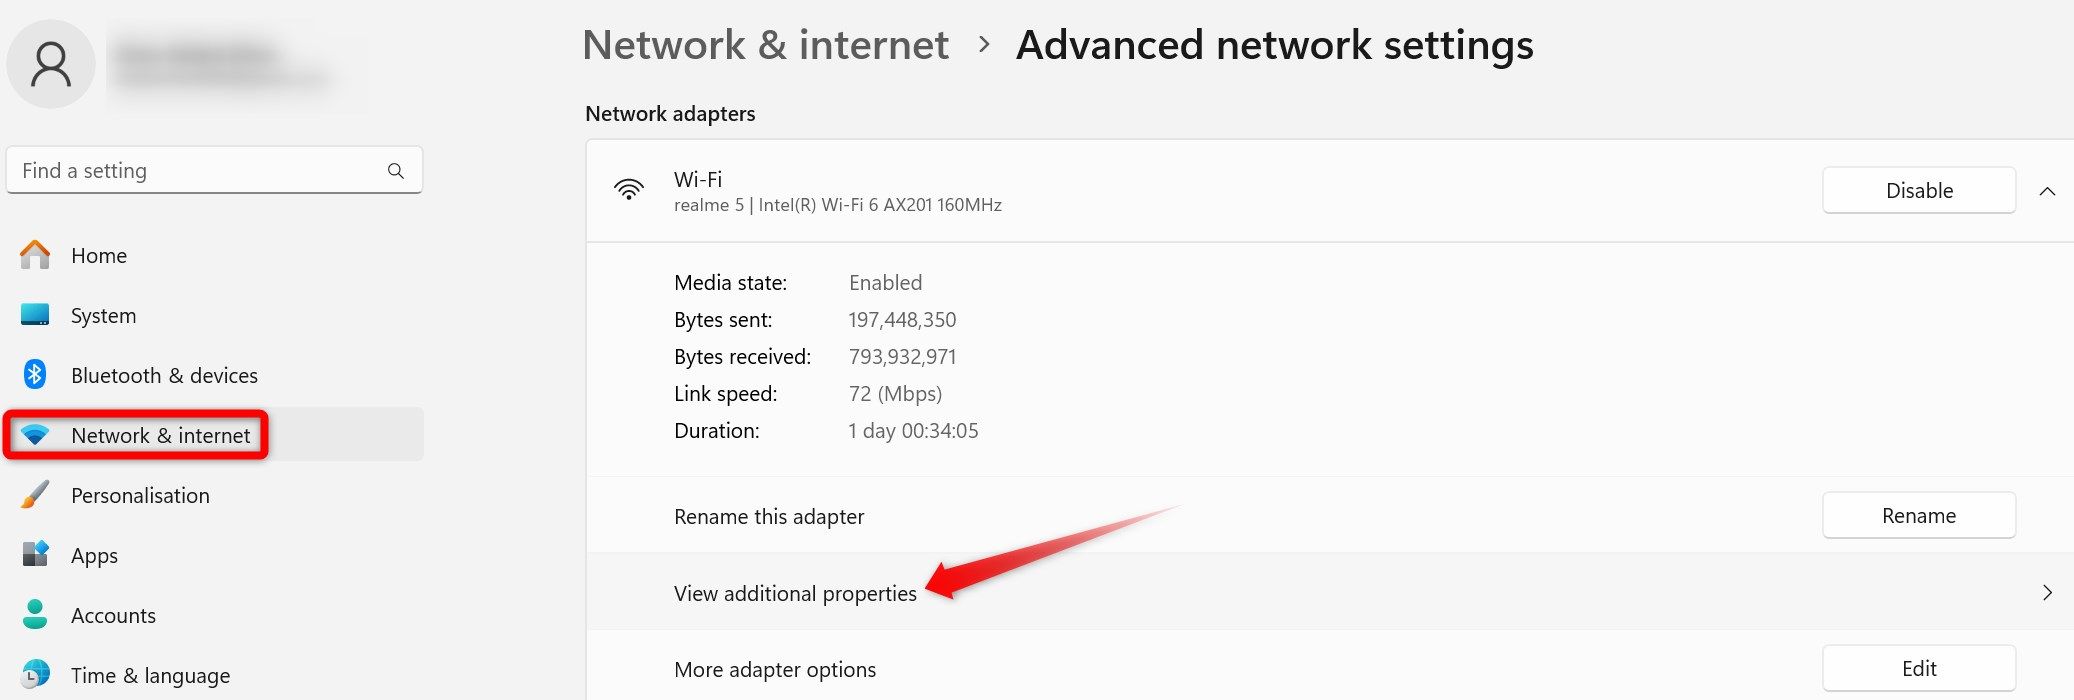
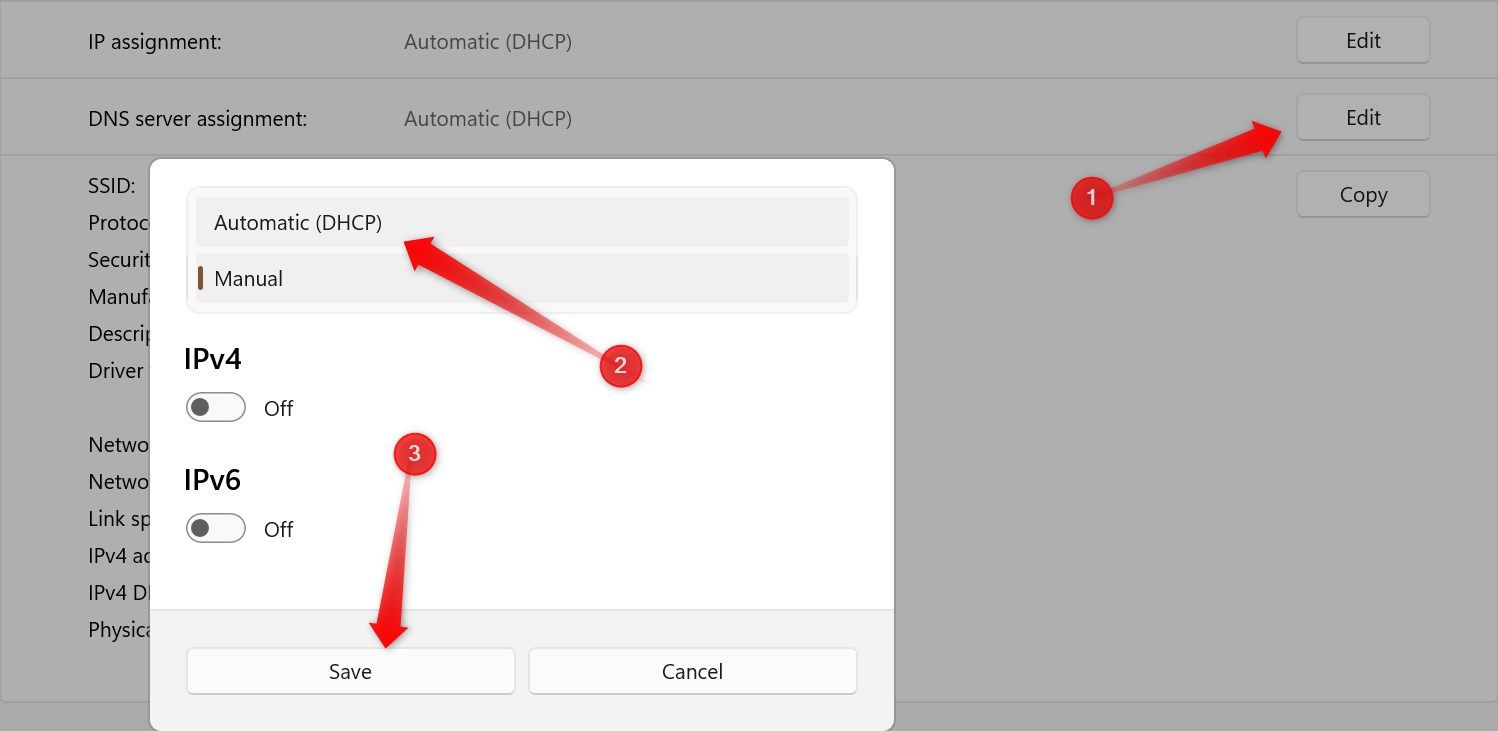
Confirm that IP Assignment and DNS Server Assignment are set to “Automatic (DHCP ).” If they are, you’re good to go.

If you see a manual entry, click the “Edit” button, select “Automatic (DHCP)” from the dropdown menu, and then click “Save.”
Update the Network Adapter Driver
Outdated network drivers can lead to various internet problems. To ensure outdated drivers aren’t the cause of the current issue, download and install the latest drivers available . Visit your device manufacturer’s website and locate the latest network drivers. If the driver file is in executable format, simply run it and follow the on-screen instructions to install it.
If the file isn’t in executable format, you can manually install it via Device Manager. Right-click the Start button and select “Device Manager.” Expand the “Network Adapters” category, right-click the appropriate Wi-Fi driver, and select “Update Driver.”
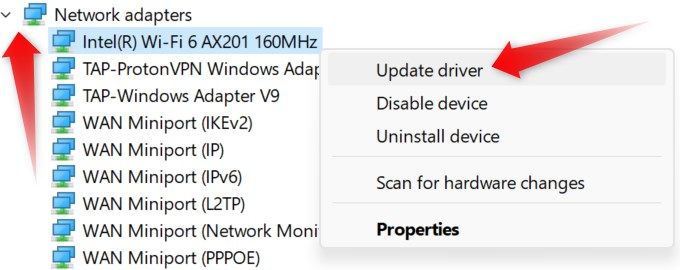
Next, select “Browse My Computer for Drivers,” then navigate to the path where you downloaded the drivers. Follow the on-screen instructions to complete the installation process.
Perform a Network Reset
If the issue persists, you can try the least favorable option: reset the network settings. This process clears all network-related information and preferences, including saved Wi-Fi networks, passwords, and VPN profiles, but it often resolves critical network problems. However, only resort to this as a last option if other fixes have failed.
To reset network settings, open the Settings app and go to Network & Internet > Advanced Network Settings > Network Reset.
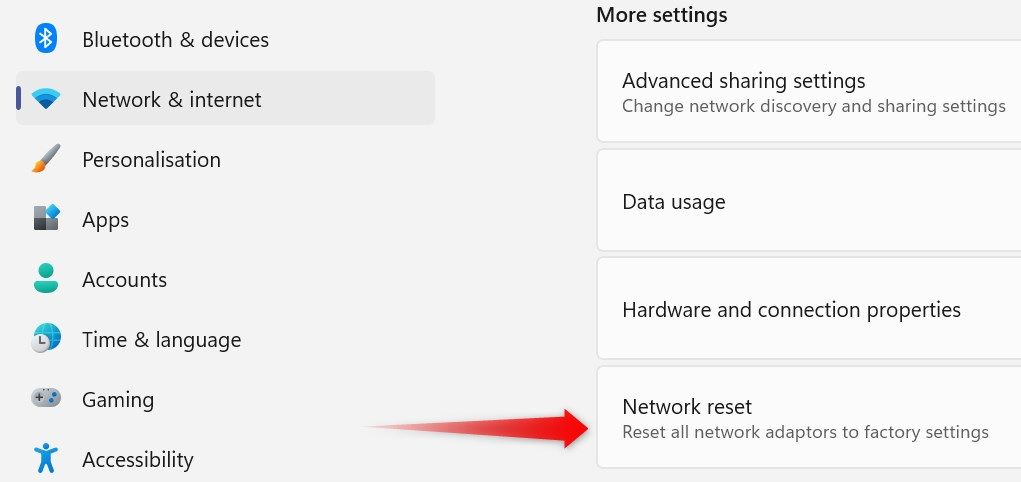
Click “Reset Now” and confirm by clicking “Yes” in the confirmation box. Then, restart your device and set up your Wi-Fi network from scratch.

Run a Few Commands in the Command Prompt
If none of the previously mentioned solutions resolve the issue, run a few commands in Command Prompt to flush the DNS cache , release and renew the IP address, and reset rules and network records. Type cmd in the Windows Search bar, and click on “Run as Administrator.”
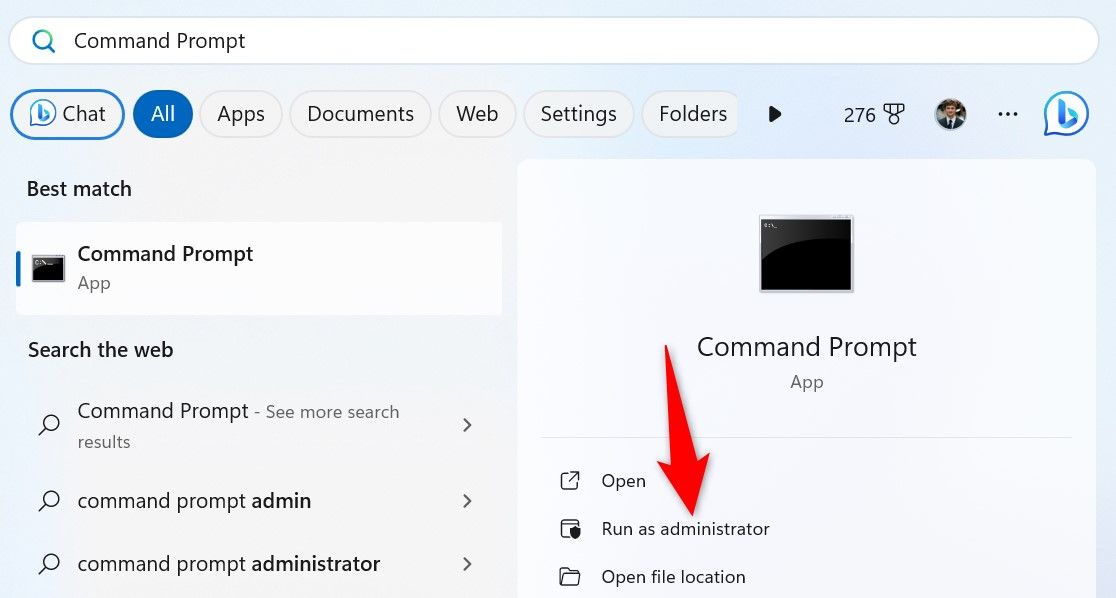
After that, input each of the following commands one by one and press the Enter key after adding each one:
`netsh winsock reset
netsh int ip reset
ipconfig /release
ipconfig /renew
ipconfig /flushdns`
If the above solutions do not resolve the issue, and you cannot establish a successful internet connection, contact your ISP representative for professional assistance.
Also read:
- [New] 2024 Approved Seamless Scenes Integrating Fade In/Out Effects
- [Updated] 2024 Edition Movavi Video Editing Suite Assessment
- 2024 Approved Beyond the Skyline with Yuneec's Typhoon Q500
- Discover the Top Max Right Now Documentaries Airing This July 2024!
- Expert Strategies for Getting Your Roku Device Back Online and Running Smoothly
- Four Innovative App Tools to Streamline Home Painting Processes
- In 2024, How to Bypass Google FRP Lock on Motorola Moto E13 Devices
- In 2024, The Easiest Path to Personalizing Your PUBG Character’s Speech
- Master the Art of PowerPoint Modifications: Tips for an Updated and Modern Presentation
- Method for Identifying & Contacting Callers of Anonymous Numbers
- Rise Through Rankings with Expert SEO Insights for Your Seagate Backup Plus Drive - The 2024 Manual
- Solving Pairing Problems: A Guide with 6 Effective Strategies for Your Apple Watch
- Troubleshooting and Repair Techniques for Lost Rockaldll.dll Errors
- Unveiling Auto-GPT: Download & Installation
- Unveiling the Features and Performance of Western Digital's Data LifeGuard Diagnostics
- Unveiling the Power of the New Apple TV 4K (Gen 3) Reviewed Here
- Update Your Minecraft Graphics Driver: Step-by-Step Guide
- Updated DVD to Computer The Easy Way to Convert and Store Your Favorite Movies for 2024
- Windows Update Woes: Solution to Crashes
- Title: Solving 'No Internet Access' Issue: Top 10 Windows 11 Troubleshooting Steps for Wi-Fi Connectivity
- Author: Stephen
- Created at : 2024-12-06 22:16:03
- Updated at : 2024-12-10 21:54:00
- Link: https://tech-recovery.techidaily.com/solving-no-internet-access-issue-top-10-windows-11-troubleshooting-steps-for-wi-fi-connectivity/
- License: This work is licensed under CC BY-NC-SA 4.0.