Solving 'Windows License Supports Single Display Language' Issue: A Step-by-Step Guide

Solving ‘Windows License Supports Single Display Language’ Issue: A Step-by-Step Guide
Key Takeaways
- Go to Settings > Time and Language > Language and Region. Then, click “Add a Language,” select your desired language, and install it.
- After that, copy the Language ID from the Microsoft website and input it into the Registry Editor to switch to your desired language.
Have you encountered an error stating “Your Windows License Only Supports One Display Language” while attempting to switch your display language on Windows? If so, you’re using a single language license, which doesn’t allow language changes. Don’t worry; we have a workaround.
Install the Language Pack of Your Preferred Language
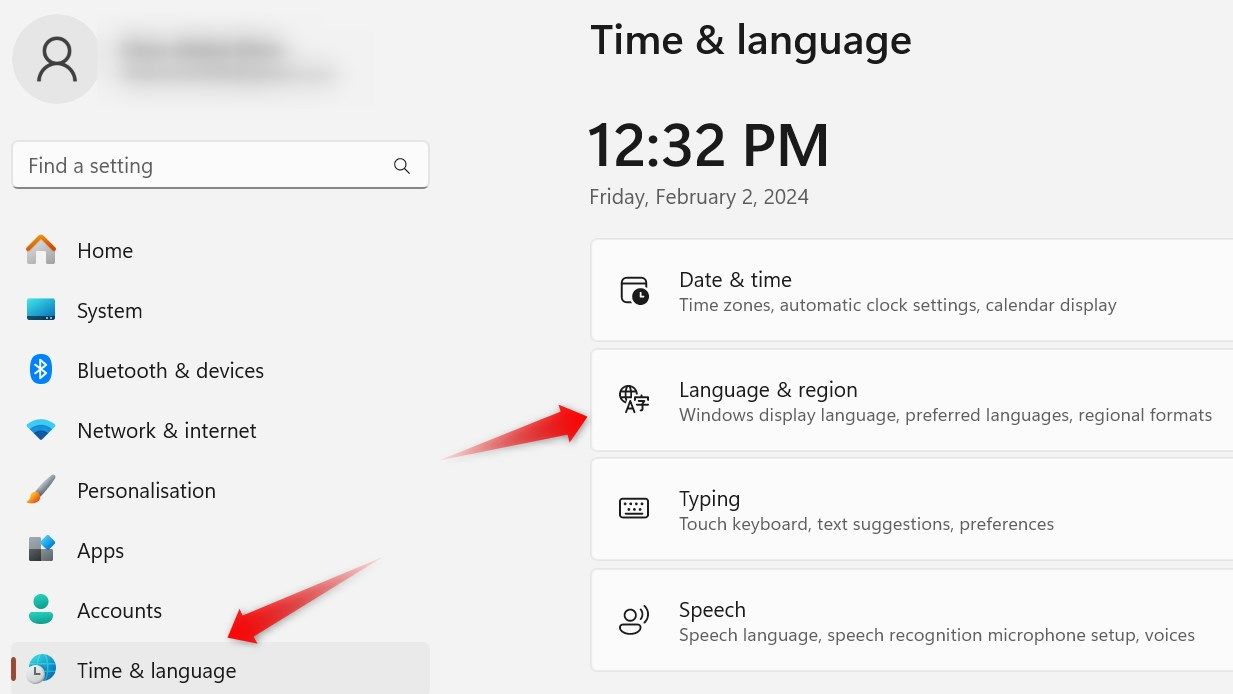
To begin, download and install the language pack for your desired language if it’s not already downloaded. Right-click on the Start button and open “Settings.” Navigate to the “Time and Language” tab, then go to “Language and Region.”

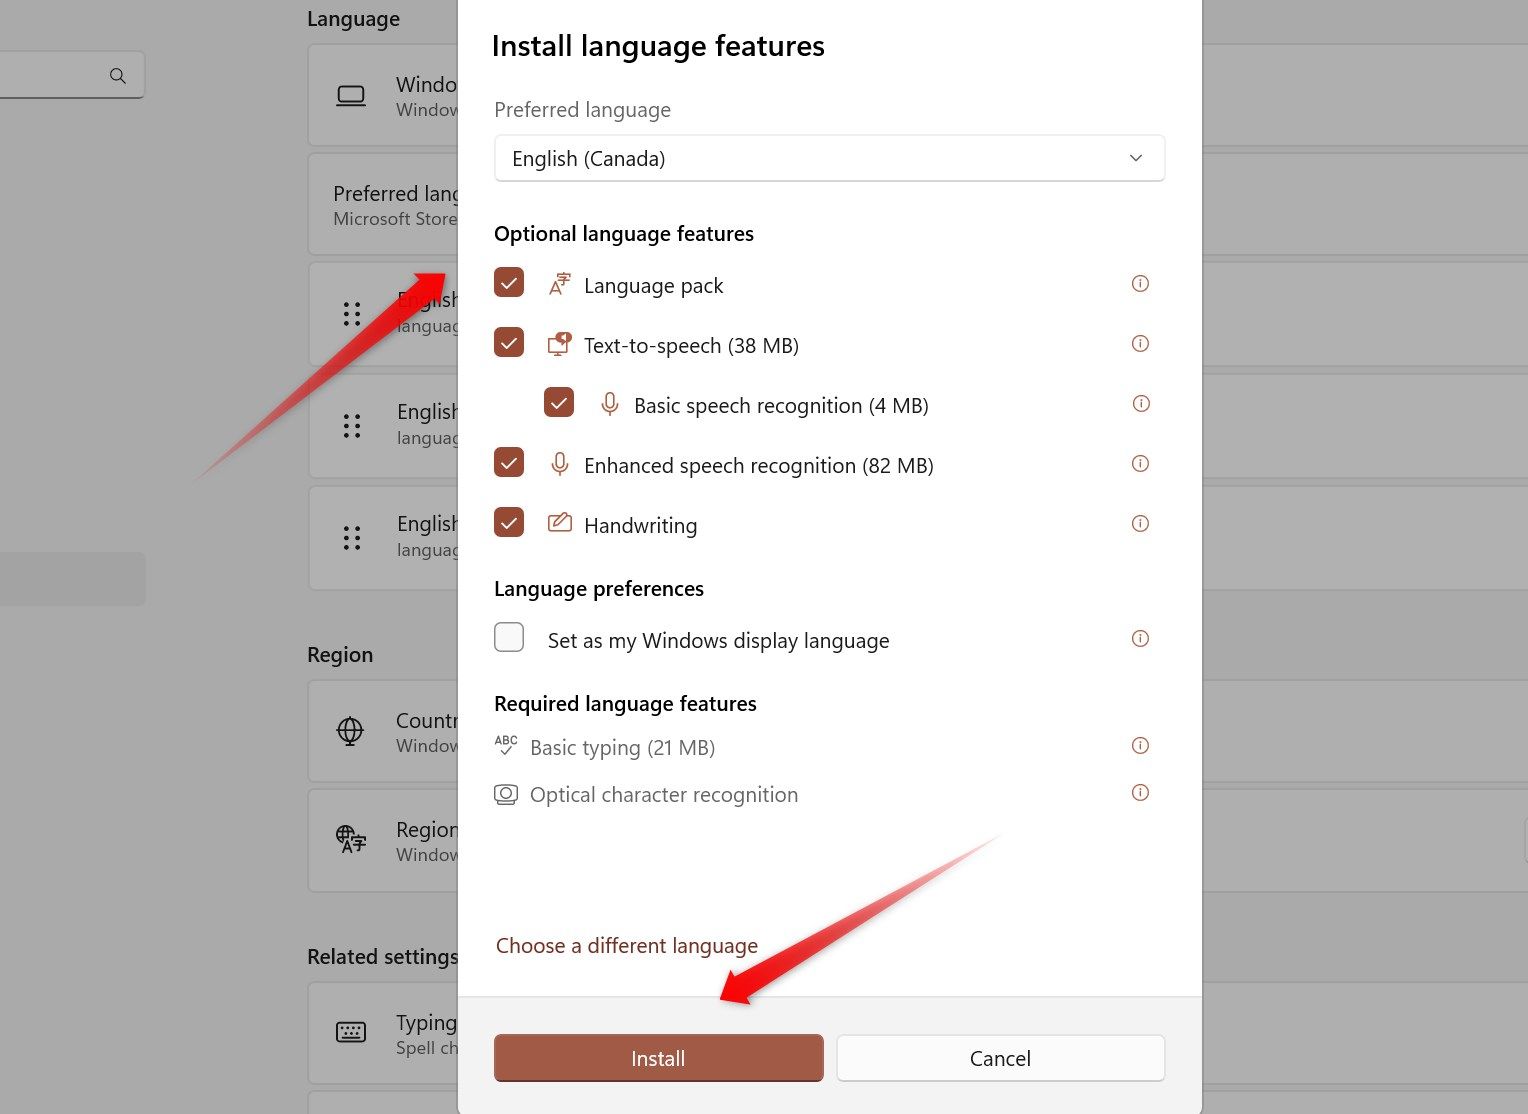
Click on the “Add a Language” button, choose your preferred language from the list, and click “Next.” Check the boxes for all optional language features, and click “Install” to allow Windows to install the chosen language.

If you’re on Windows 10, installing a language pack follows a slightly different procedure .
Switch the Language Using Registry Editor
After installing the language pack, you can switch to that language using the Registry Editor . Before you do that, go to the Microsoft website , press CTRL+F, and type the name of your desired language to locate it. Once found, copy the last four digits of its Language ID.

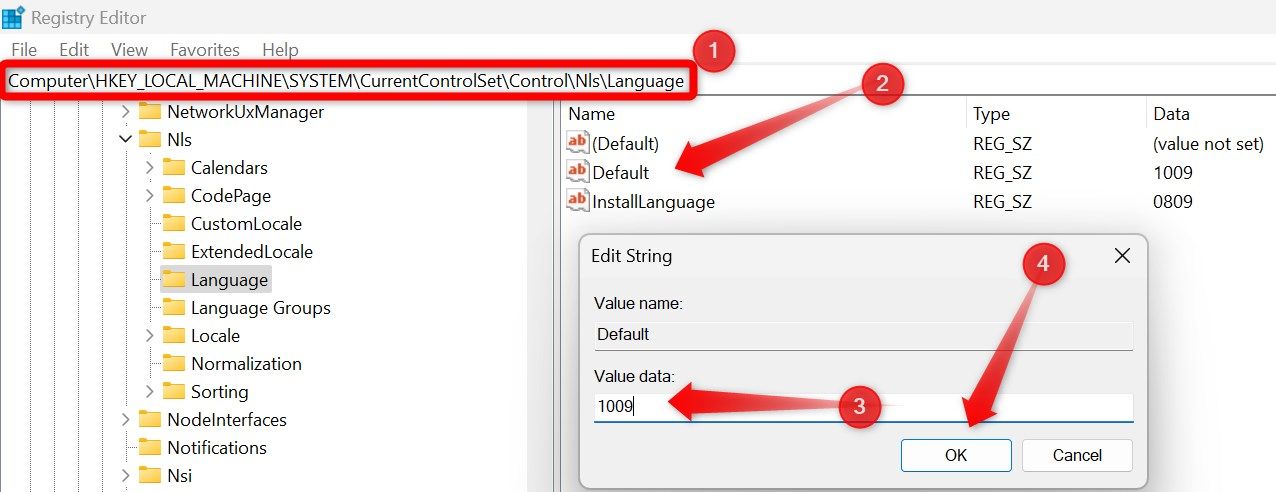
After that, type “Registry Editor” in Windows Search and open the Registry Editor app. If prompted, click “Yes” in the UAC window. Navigate to HKEY_LOCAL_MACHINE > SYSTEM > CurrentControlSet > Control > Nls > Language in the Registry Editor. Then, double-click on the “Default” string, and paste the last four digits of the Language ID into the “Value Data” field. Click “OK.”

After that, double-click on the “InstallLanguage” string, input the copied digits in the “Value Data” field, and click “OK.” Close the Registry Editor and restart your device once.
While this method lets you change the language, it’s important to note that you’ll need to modify the values again if you wish to switch back. So, we suggest upgrading your Windows license . This way, you’ll be able to effortlessly use and switch between languages without the need to tweak the Registry Editor.
Also read:
- [New] In 2024, Discovering Portable Recording Solutions for Mac Users
- [New] In 2024, Optimizing Engagement on Instagram with YouTube Story Features
- 如何在很短的時間裡,學習影片鏡頭反覆技術 - 下載教材
- Download & Install HP OfficeJet Pro 8610 Drivers: Latest Updates for Windows 11/8/7/XP/Vista Compatibility
- How To Fix Part of the Touch Screen Not Working on Poco X6 | Dr.fone
- How to Use ChatGPT on Android and iOS
- In 2024, Infiltrate Live Tips for Guesting on TikTok Sessions
- In 2024, The Complete Guide to Crafting LUTs in 3D
- Navigating Your Next Purchase: PlayStation Portable's Cost, Hardware Specs & Launch Details
- Solving Common Issues with Your Xbox Series X and S Gaming Headsets
- Steps to Remove Pictures From iCloud Without Losing Them on iPhone
- Tracing the Progress: In-Depth Analysis of Each iOS Version, From 1.0 to 18.0
- Unlocking PS4 Controller Color Codes: Understanding Blinks in Blue, White, Red, and Orange Hues
- WhatsApp on Your Mac: Tips and Tricks for Seamless Communication
- Title: Solving 'Windows License Supports Single Display Language' Issue: A Step-by-Step Guide
- Author: Stephen
- Created at : 2024-12-05 13:35:23
- Updated at : 2024-12-10 20:44:54
- Link: https://tech-recovery.techidaily.com/solving-windows-license-supports-single-display-language-issue-a-step-by-step-guide/
- License: This work is licensed under CC BY-NC-SA 4.0.