
Step-by-Step Instructions for Taking Screenshots with a Lenovo PC
Getting Your PC Ready for Enhanced Innovation with Windows 11 Creator’s Updates: Key Steps
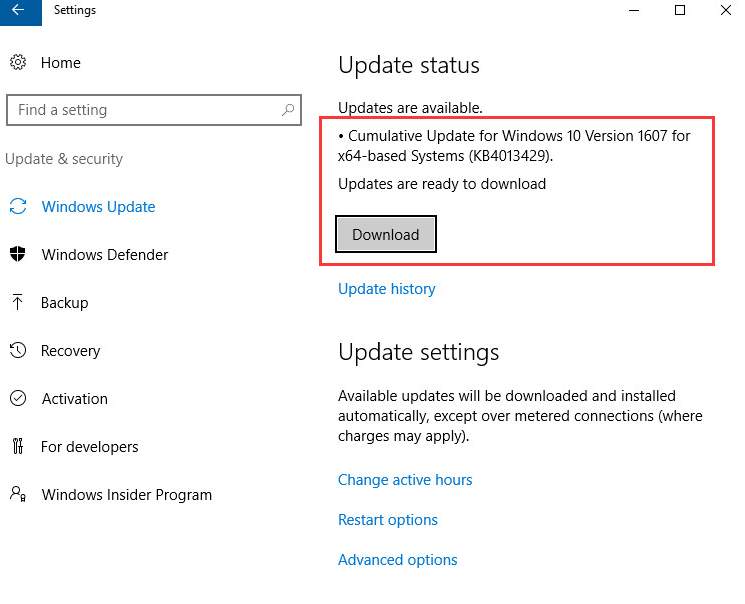 Windows 10 just released its latest update, building up to the coming soonWindows 10 Creators Updatein just a couple of weeks. We have talked about the exciting new features in the new update before in What’s new in Windows 10 Creators Update .These new features include a number of media-friendly additions to the software, such as 3D modelling, virtual reality support, gaming and social media. It is always exhilarating for users who love to enjoy new features that are making their life better. But before we fully embrace the push of the new Windows 10 Creators Update, we need to get something ready beforehand. NOTE: If you are running Windows 10 Anniversary Update, you can get the Windows 10 Creators Update for free. But if you are running Windows 7 or 8.1, then you will need to purchase Windows 10 to be eligible for the upgrade. Step 1: Back UpThere is a very likely chance that the update is not going to work very well for you in the very first day of its release. After all, we have all heard of or experienced the tragic events when the new update crashed the system or rendering the unattainable of some system files. Therefore, it will never be emphasized enough to backup all your important files and programs to a safe place before you go on to the upgrade. There are many cloud services nowadays that you can trust, to store your system files and data on and quite a number of them are free. OneDrive for instance, is a service provided by Microsoft that you should have faith in. Of course, you can also use other products that you trust for the backup, no problem.Step 2: Modify Windows Update setting Some would call every Windows updates “unstoppable automatic updates”, but we know that this is not true. Of course you have full control over all the updates. The Windows Update is turned on by default on Windows 10, meaning that you are getting the new released patches and builds downloaded and installed on your computer automatically. For some users, this is pretty neat and satisfactory since they are always getting the latest updates and patches installed. But for others, the automatic update is rather irksome, since the update could happen even when they are in the middle of more important things. Making ti worse, it has been reported that the automatic update goes on even when your computer is using metered internet access, meaning that you would end up being charged for data that have never been planned on using. To disable Windows Update, here is what you need to do. 1) ClickStartbutton, then go toControl Panel. In the Control Panel, chooseSystem(View byLarge icons).
 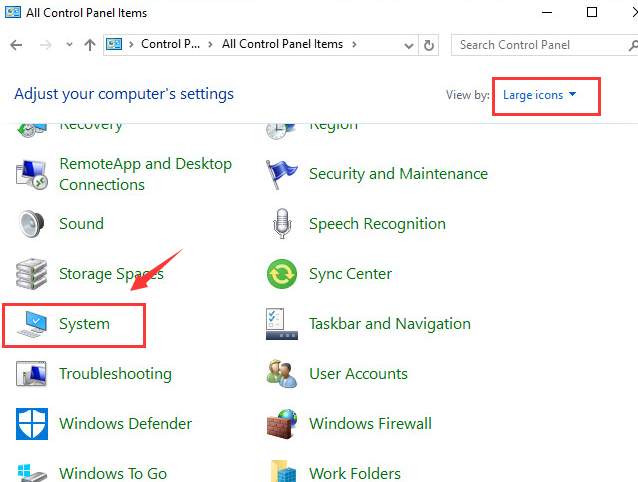 2) ChooseAdvanced system settingson the left side of the pane.
 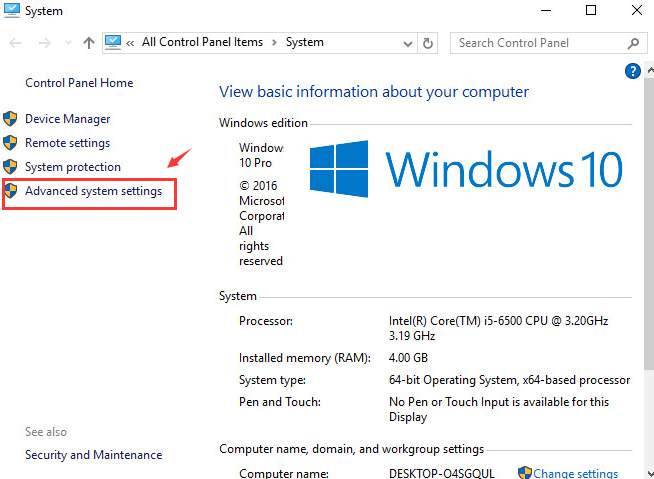 3) Navigate toHardwaretab, then chooseDevice Installation Settings.
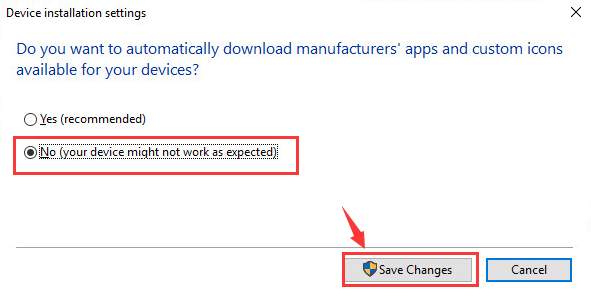
 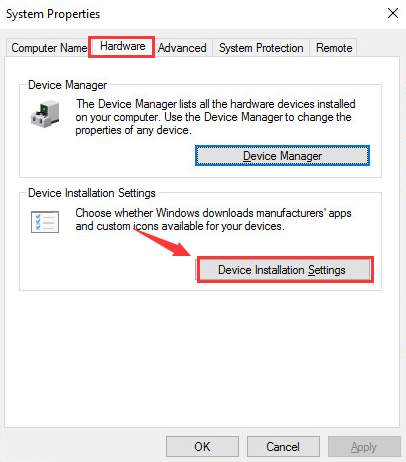 4) On the new window, chooseNo (your device might not work as expected) optionand then clickSave Changesto save and exit.
Now, you don’t have to worry about getting the update without your consent. When you finish doing the preparation for the Windows 10 Creators Update, all there left is to wait for your machine to be targeted at the update. Just be patience, in just a couple of weeks, you will get hands to the amazing and exciting features in the biggest update following Windows 10 Anniversary Update.
Also read:
- [New] 2024 Approved Ultimate List of Top Voice-Change Programs
- [New] In 2024, Triggering Uninterrupted YouTube Streaming on Facebook Feed
- [Updated] 2024 Approved Free, Cutting-Edge Beat Detection for Aspiring Producers
- [Updated] Top FREE Template Libraries for Aspiring AE Artists
- 2024 Approved Android Photo Editing Uncovered Complete Review of Lightroom App
- Expert Advice for Restoring Functionality in Microsoft Edge When It Fails
- Expert Breakdown Free2X WebCam Tools Insight for 2024
- Fixing Missing DLL Files: A Focus on Correcting D3dx9_nul Not Detected Mistakes
- In 2024, How To Fix OEM Unlock Missing on Honor X7b?
- Mastering Platformer Fun: Top 6 Super Mario Bros Titles on Your Personal Computer
- Navigating the Future with Apple's Developer Conference 2Vews - Announcements, News, and Insights Revealed
- Reviving a Stuck Laptop or Tower: Steps You Need to Know
- Samsung's Latest Smartphone Release: Unveiling the New Era
- The Insider's Blueprint for Snagging Cheap Dell Computers as a Student
- Understanding T-Mobile's Intra-Network WiFi Roaming: A Guide
- Unleash the Full Potential of Comic Viewing in Win11
- Title: Step-by-Step Instructions for Taking Screenshots with a Lenovo PC
- Author: Stephen
- Created at : 2025-01-25 20:04:10
- Updated at : 2025-01-30 20:02:34
- Link: https://tech-recovery.techidaily.com/step-by-step-instructions-for-taking-screenshots-with-a-lenovo-pc/
- License: This work is licensed under CC BY-NC-SA 4.0.